Why your face score changes between photos
Two photographs of the same person can produce different measurements because the camera captures a different view each time. Distance, light, head position and expression can all alter the visible landmarks. A score produced from those landmarks can change in turn. This guide helps you investigate the difference without guessing which photograph shows a single definitive version of your face. The current free tool provides eight local measurements, so the exercises work with raw ratios and angles even when a combined score is unavailable. Start with one clear reference, change one condition and keep the original files beside your notes.
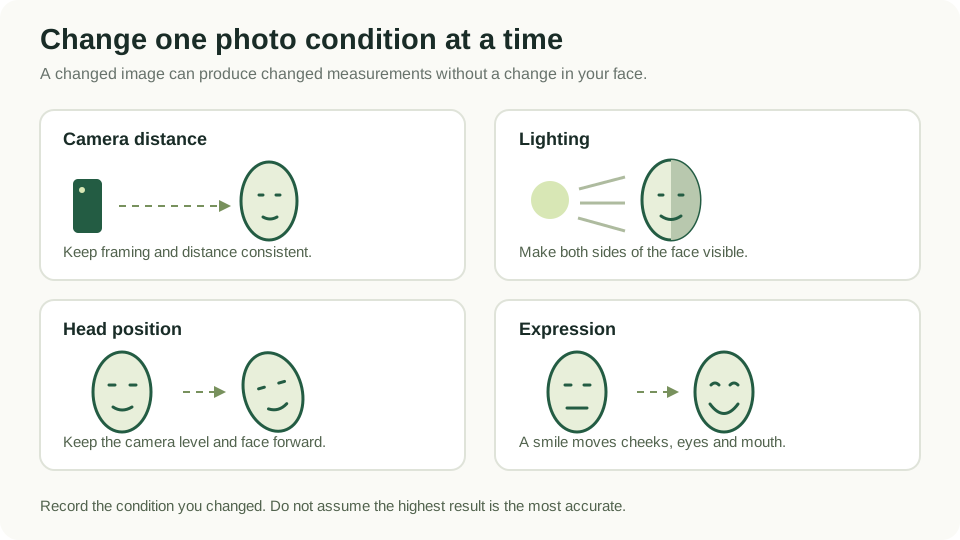
Separate a new photograph from a new face
When comparing results, begin by listing what changed between the captures. Perhaps one image is a close selfie and the other was taken by someone across the room. Perhaps one includes a smile, a filter or a strong shadow. These differences change the information available to the detector. A report is calculated from that information, not from a persistent model of your face stored somewhere behind the scenes. A change in output therefore needs a photographic explanation before you infer anything about a change in appearance.
There may also be differences between the tools themselves. An app can choose different landmarks, use different reference intervals or transform a measurement into a different display scale. Keep a same-tool comparison separate from a cross-tool comparison. In the first, you can focus on capture conditions while the method stays constant. In the second, the method is another variable. Combining both at once makes it difficult to explain the result, even if the two displayed numbers happen to look directly comparable.
Investigate camera distance and perspective
Features closer to the camera can appear larger relative to features farther away. At a very short distance, this can noticeably change the relationships in a face image. Moving the camera back changes perspective, while digitally cropping the resulting photograph changes framing. A crop does not recreate the perspective of a closer lens. To explore this distinction, keep the camera at eye level, take a reference photograph at a comfortable distance and compare it with a closer capture made without changing your expression.
Do not try to make the exercise more precise by choosing a distance that your setup cannot reproduce. Instead, mark where the stand and chair were placed, or use a stable feature in the room as a reference. Keep enough detail in both images for the face to remain clear. When reading the results, examine several raw measurements rather than assuming that one camera distance must raise all subscores together. Different landmarks can respond differently to the changed view, which is exactly what the comparison is intended to reveal.
Check lighting before adjusting the calculation
Light affects the visibility of boundaries and corners. A strong shadow along one cheek can make an outline less distinct; a reflection can hide an eye corner; an overexposed region can lose texture and edge detail. These are input changes even when you feel that the pose is identical. Inspect the original photographs side by side and look for differences around the features used by the unexpected measurement. It is often easier to identify an uneven shadow visually than to infer it from the final report.
For a lighting exercise, fix the camera position and head direction, then compare diffuse frontal light with light arriving from one side. Keep the change deliberate and label each file immediately. Avoid adding a filter to make the images look more similar afterward, because that introduces another processing step. A usable comparison does not need matching artistic quality. It needs enough visible detail to understand which areas changed and a record of the setup that produced them. Return to the even-light reference for subsequent measurement sessions.
Distinguish yaw, pitch and roll
A head turn toward the left or right is commonly described as yaw. Raising or lowering the face changes pitch. Tilting toward a shoulder changes roll. Each alters the photograph differently: a turn can hide part of one side, a raised chin changes the visible lower-face outline, and a sideways tilt changes orientation in the frame. Keeping these movements separate is useful when a pose warning appears or when you want to reproduce a reference photograph. “Same angle” becomes much clearer when you name the movement.
The current tool supports a near-frontal input and includes pose checks before calculation. It also uses a local orientation reference for some measurements. That does not mean it can reconstruct a fully frontal view from every accepted angle. If you want to explore pose, begin with a level reference and change only one movement slightly. A rejected photo belongs in your notes as a rejected condition, not as a missing score to replace with zero. This distinction matters if you later summarize several attempts.
Notice expression as a separate variable
Smiling changes the mouth corners and cheek shape. Squinting changes the visible eye opening. Raising the eyebrows changes parts of the upper face. Those movements can affect more than one measurement at once because several calculations use neighboring landmarks. A change that begins around the mouth may alter the apparent lower-face relationships, while an eye expression can affect spacing or angle estimates. The report is describing the expression captured at that instant, so use a relaxed expression when you want a neutral reference.
For an expression exercise, keep the device supported and the lighting steady. Take a relaxed image, then one with a natural smile, and label the pair before uploading. Read each report without deciding in advance that the smiling photo should score better. A portrait’s appeal and a geometry reference comparison are different tasks. You may prefer the smile for a profile while finding the relaxed image easier to reproduce for measurements. Keeping both purposes in view makes the comparison useful instead of turning it into a contest between photographs.
Look for editing and export differences
A camera app may apply smoothing, reshaping or automatic portrait effects before the file reaches the uploader. A messaging service may resize and compress the image after it is shared. A screenshot may include another scaling step. These processes can change visible detail or geometry, so check the file’s history when two apparently similar images behave differently. Prefer the original capture for a reference and note any edits you intentionally apply. The name of the camera alone does not tell you which processing occurred.
Uniform resizing and geometric reshaping should be considered separately. Uniform resizing changes pixel dimensions while retaining the image’s proportions. Stretching one axis or applying a face-shaping filter changes the proportions themselves. Compression can preserve the broad outline while degrading fine detail. If you compare an original with an exported copy, keep the pose and capture identical and label the export operation. This lets you ask a specific question about the file transformation instead of treating the two versions as independent evidence about your face.
Separate measurement variation from display rounding
Reports often display a limited number of decimal places to keep values readable. Two internal values can therefore produce the same displayed result, and a small change near a rounding boundary can alter the final digit. This is a display issue, distinct from a larger shift caused by pose or landmark placement. When you compare screenshots, retain the units and labels and avoid interpreting the last digit in isolation. Check whether the visible photo conditions and the other measurements support the story you are considering.
A reference subscore introduces another transformation: it maps a measurement to a chosen interval or rule. If an optional combined score is available, it combines several contributions again. A difference at the final display can consequently arise from more than one stage. Start with the raw measurements to narrow the question. We do not publish a validated threshold at which a change becomes meaningful, so a small numerical difference cannot be treated as a proven improvement or decline merely because it appears on a ten-point scale.
Use a small comparison log
A helpful log can contain the date, image filename, camera setup, changed condition, quality-check outcome and the measurements you want to inspect. Keep the condition field descriptive: “window in front” or “slight turn left” is more useful than “good photo” or “bad photo.” If the tool rejects a file, record the reason and leave measurement fields empty. Do not invent a numerical result for an attempt that did not produce one. Store the log privately with the photographs if you need to revisit the comparison.
For example, create three entries named reference, lighting change and reference repeat. The first and third use the same intended setup, while the middle changes only the light. This gives you a small check on repeatability as well as the deliberate change. You may discover that the repeated reference also varies. That observation is useful because it shows how well you reproduced the conditions; it does not invalidate the exercise. Describe what happened and identify a clearer next capture only if the original question remains unanswered.
Summarize observations without overstating them
A careful summary says which images were compared, what you changed and what the report showed. For example: “With the same camera position, the side-lit image produced a different jawline reading, while eye spacing stayed similar.” That is a specific observation about your files. It is more informative than saying that side lighting always changes someone’s attractiveness by a fixed amount. A controlled personal exercise can help you understand the tool, but it does not supply a population distribution or a general effect size.
If you calculate an average across your attempts, label it as an average of those photo results and retain the sample count. Repeated photographs are not necessarily different people, and rejected images do not belong in a completed-result average. These distinctions become especially important when a website publishes statistics. A useful distribution needs a defined time period, inclusion rules and an honest description of the sample. Until such data exists, your comparison log remains a private learning aid rather than evidence for an average attractiveness score among visitors.
Choose the next action from the observed problem
When you can identify a capture problem, correct that specific condition and make one fresh reference. When the photographs are already clear, read the measurement definition and reference settings before taking more pictures. When you are comparing different websites, inspect their methods before trying to average their results. Each of these actions addresses a different source of variation. Choosing the right one is more efficient than repeatedly uploading new selfies without a testable question or a consistent record of what changed.
Use the checklist below to prepare a comparison, then finish once you have answered the question you started with. The photo-preparation guide provides a repeatable setup, the symmetry guide explains paired landmarks, and the proportions guide explains ratios and endpoints. Together they let you move from a surprising number to a concrete inspection of the input and calculation. The free report supplies the measurements; your labeled photographs supply the context that makes those measurements useful.
Your practical checklist
- Start with one clear, labeled reference photograph.
- Keep the tool and method constant when comparing captures.
- Change just one camera, lighting, pose or expression condition.
- Retain original files and note any export or filter.
- Record rejected photos as rejected, not as zero scores.
- Compare raw readings with their labels and units intact.
- Describe only the observations supported by your comparison.
References and next steps
The illustration and practical exercises are original educational examples. For the tool’s implementation details, read the measurement methodology and Google’s Face Landmarker documentation.
Explore How Attractive Is My Face? or open the free eight-measurement report.
Corrections or questions: [email protected].