How to take a fair face photo
A useful face photograph starts with a repeatable setup. The aim is to give the measurement tool a clear view of the landmarks it needs, then keep enough information about that setup to understand the result. You do not need studio equipment. A phone, a stable support and a source of even light are enough for a practical starting point. This guide walks through preparation, capture, quality checks and a simple comparison exercise. It is written for the current eight-measurement report, so you can use it without waiting for a combined attractiveness score.
Decide what you want to compare
Before opening the camera, write down the question you want the photograph to answer. You might want a clean reference for the symmetry report, a better view of eye spacing, or an explanation for an unexpected jawline measurement. Those are different tasks from choosing an expressive portrait for a social profile. A lively smile can be a good portrait choice while also moving the points used by a geometry calculation. Keeping the purpose explicit makes it easier to choose a suitable expression and interpret the output afterward.
For a first report, use one photograph as your reference and resist collecting a large set of alternatives immediately. Record the camera you used, whether a filter was enabled and where you stood. A short note such as “rear camera, eye level, window in front” is enough to start. You can add detail later if you investigate a specific difference. The point is to retain context, not to turn a quick measurement into a complicated photographic project.
Position the camera before positioning yourself
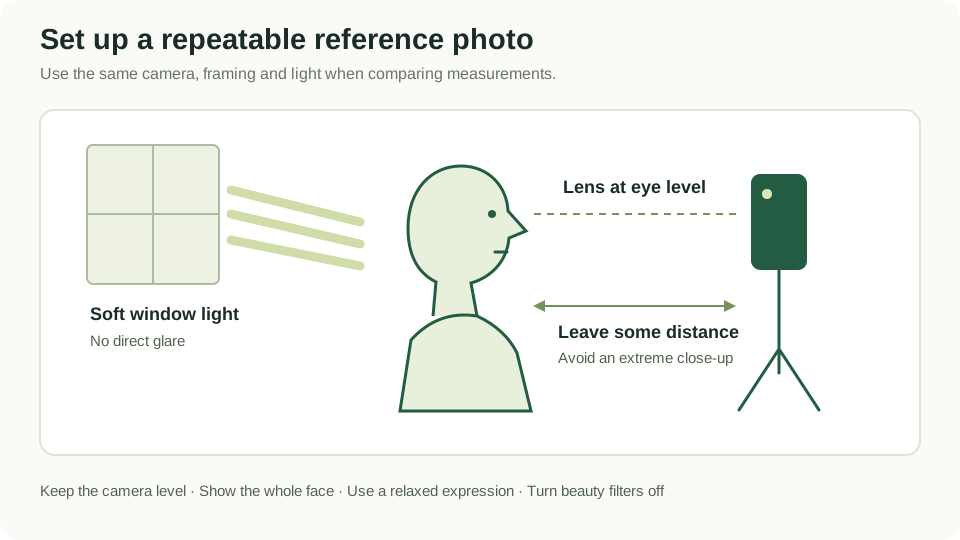
Place the lens near eye level and keep the device upright. A shelf or phone stand can make this easier than holding the device at arm’s length. Check the location of the lens rather than the center of the screen: on a phone, these are usually different places. Look toward the lens when taking the photograph, and leave space around the top, sides and bottom of your face so the outline is not cropped.
Start far enough back to capture a comfortable head-and-shoulders view, while keeping the face clear in the final image. Moving the camera changes perspective; cropping afterward changes framing. These are separate operations. If your face looks unusually stretched in a close selfie, stepping back and reframing is a more informative comparison than applying a different filter. Keep the distance consistent for subsequent photos rather than searching for a supposedly ideal number of centimeters that fits every camera.
Build an even lighting setup
Face a window with indirect daylight, or use a diffuse indoor light that illuminates both sides of the face. Inspect the eye corners, cheek outline and lower jaw on the screen. You should be able to see these areas without deep shadows or large patches of lost detail. A bright window behind you can leave the face dark even when the room seems well lit. Turning toward the light is often a simpler adjustment than raising exposure until the background disappears.
Avoid changing several lights at once during a comparison. For example, if one side of the face is dark, first change your position relative to the window and leave the camera untouched. Take another image and inspect it before making any other adjustment. If daylight changes rapidly, finish the comparison promptly or return when conditions are steadier. The useful quality here is consistency across the face and across your comparison images, not a dramatic or professionally styled lighting effect.
Prepare the face area without changing its shape
Move loose hair away from the eyes and the visible face outline. Wipe the camera lens if the image appears hazy. Remove decorative overlays, smoothing filters and face-shaping effects in the camera app. Some camera applications remember these settings between sessions, so check the actual controls instead of assuming that a new photo starts with default settings. Keep a copy of the original file if you plan to make a crop, and avoid repeatedly saving a compressed screenshot of a screenshot.
Glasses can remain in an ordinary portrait, but reflections and thick frames may obscure the points around the eyes. If it is comfortable, a second photo without glasses can help you investigate a detection problem. Treat that as a visibility comparison, not as a judgment about which appearance is better. Facial hair can similarly affect the visible jaw outline. The tool measures what the image shows; it does not see through hair to recover a hidden anatomical boundary.
Keep the head and expression consistent
Face the camera directly, keeping your shoulders comfortable and your head upright. A small turn can make one side of the face appear narrower, while a raised chin can change the visible lower-face outline. Check that both eyes are clearly visible and that neither side is hidden behind hair or a hand. You do not need to hold a strained pose. Relax, look toward the lens and take a small number of photographs rather than maintaining an uncomfortable position.
For a reference measurement, choose a relaxed expression with the mouth at rest. A broad smile moves the mouth corners and cheeks; squinting changes the visible eye opening. These movements are useful when exploring expression, but they make it harder to compare static proportions across otherwise different images. If you do take a smiling image, label it as such. Keep the neutral and expressive versions as separate conditions instead of silently replacing one with the other in your notes.
Check the file before uploading
Open the saved image at a size where you can inspect the eyes and lower face. Look for motion blur, an accidental crop and strong compression blocks. Enlarging a small thumbnail does not restore missing detail, and sharpening cannot reliably recreate a hidden landmark. If the original capture is unclear, take a new photograph with a steadier camera and enough light rather than repeatedly editing the same weak source. This saves time when a quality check would otherwise reject it.
The uploader accepts JPG, PNG and WebP files smaller than 10 MB. It expects one visible face, so use a solo photograph rather than a group image. Do not include another person simply because their face is small or distant; the detector can still identify it. If your camera saves a different format, export a supported copy using your usual photo application and inspect that exported file before uploading it. Keep its aspect ratio intact rather than stretching it to fit a square.
Use rejection messages as capture instructions
A quality message is most useful when you change the condition it identifies. If the face is too small, adjust framing while retaining a comfortable camera distance. If the image is too dark, improve illumination of the face rather than adding a beauty filter. If the pose is too far from frontal, level the camera and look toward the lens. Retake only after identifying what you changed, so a successful second attempt teaches you something about the setup.
A rejection is not an appearance rating. It means that the image did not meet a rule used before the measurement report is calculated. The current method checks face count, size, pose, brightness and sharpness; the exact settings are listed on the methodology page. A photograph can also pass these rules while retaining some uncertainty. If a measurement looks surprising, return to the original image and inspect the relevant area instead of assuming that passing every gate makes each landmark exact.
Run a controlled example comparison
Imagine that your first photograph was taken with the phone below eye level and the room’s ceiling light overhead. Your jawline reading looks different from what you expected. Make a reference image with the phone level and a diffuse light in front. Next, keep the new camera position fixed and take one additional image under the original overhead light. These labeled conditions let you inspect lighting separately from camera height, which an unstructured series of selfies would mix together.
Read the raw jawline value and the other measurements, then write down which changed and which stayed similar. There is no requirement that every adjustment produces a higher reference comparison. The exercise is about understanding the inputs. You might find that the eye measurements stay similar while the jaw outline changes, or that several values shift together when the head turns. Keep the observations tied to the actual photographs and avoid extending a two-image comparison into a claim about everyone’s camera behavior.
Finish with a usable reference record
After a successful upload, read all eight measurements before making another capture. Save a private note with the date, image filename and setup if you want to repeat the exercise later. Record raw ratios or angles with their labels so you do not confuse an eye-spacing ratio with a reference subscore. If you save a screenshot of the report, check that the labels and units remain visible. A bare number copied into a note loses much of the context that makes it useful.
End the session once you have a clear reference and an explanation for any obvious capture problem. You can reuse the checklist below for future photographs without repeating the entire experiment. For a later comparison, reproduce the original setup first, then change one condition deliberately. This turns the guide into a practical routine: prepare the image, confirm the visible detail, read the measurements and retain enough context to understand them. The next step is the free report, not an endless search for a different selfie.
Your practical checklist
- Define the measurement question before taking the photo.
- Place the lens near eye level and leave the face outline visible.
- Use even light and check both eye corners for reflections.
- Disable smoothing, reshaping and decorative filters.
- Choose one consenting adult and a relaxed reference expression.
- Use a sharp JPG, PNG or WebP smaller than 10 MB.
- Record the camera setup and read the eight labeled measurements.
References and next steps
The illustration and practical exercises are original educational examples. For the tool’s implementation details, read the measurement methodology and Google’s Face Landmarker documentation.
Explore Face Rating or open the free eight-measurement report.
Corrections or questions: [email protected].