Understanding facial symmetry
Facial symmetry is easiest to understand as a comparison between corresponding locations on two sides of a photograph. The report begins with detected landmarks, chooses pairs and measures how those pairs relate to a face-centered axis. That process produces a description of an image. To use it well, you need to know what was paired, how the distances were normalized and which parts of the photograph might change the detected positions. This guide explains those ideas through a simple drawing exercise, a worked numerical example and a repeatable photo comparison.
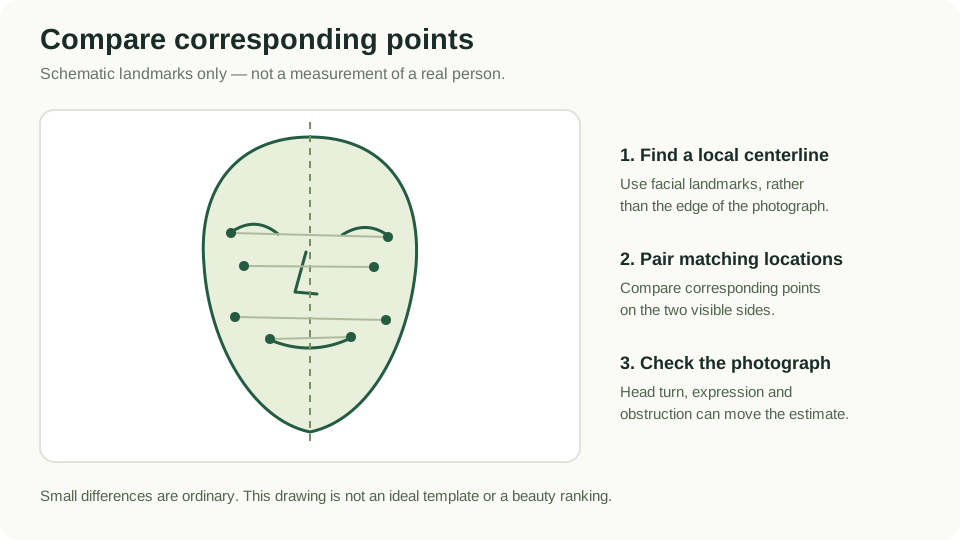
Begin with the centerline
Imagine drawing a vertical line through the middle of a frontal face photograph. A basic symmetry exercise compares a point on the left with its counterpart on the right after reflecting one side across that line. If the reflected point lands near its counterpart, that pair has a small difference under this definition. If it lands farther away, the pair has a larger difference. The line and the points are both choices in the measurement method, so they need to be defined before the result can be interpreted.
Our implementation uses a local face coordinate system rather than treating the edge of the photograph as the reference. That distinction matters when the image has extra space on one side or when the whole photo is rotated. The pupil relationship helps establish orientation, while selected paired landmarks describe the visible features. You can see the idea in the diagram: matching colors identify counterpart points, and the central line supplies the reflection axis. The drawing is explanatory, not a result measured from an individual.
Understand what counts as a landmark
A landmark is an estimated location associated with a feature, such as an eye corner or a point along the face outline. It is not a complete description of the surrounding skin, texture or three-dimensional surface. When the detector places a point, the rest of the measurement pipeline uses that position as an input. If a corner is partly hidden by a reflection or an eyelid, the estimated position may change even though the underlying feature has not changed between photographs.
The local tool uses MediaPipe Face Landmarker to obtain its face landmarks, then applies its own measurement calculations. Our symmetry calculation uses fourteen selected counterpart pairs, rather than treating every landmark as an independently meaningful observation. The choice of pairs is documented in the implementation and summarized in the methodology. This separation helps explain why two applications can use the same landmark detector and still display different symmetry readings: the detector provides locations, while each application chooses how to compare them.
Why the measurement is normalized
A gap of four pixels means different things in a tiny thumbnail and a high-resolution image. To make distances more comparable, the tool relates them to another distance within the face, using pupil spacing as a scale reference. This produces a relative measurement rather than a value tied only to the image’s width. Resizing the same image uniformly should preserve these ratios when the landmark positions scale with it. Stretching an image horizontally or vertically is different because it changes the relationships themselves.
Consider a simplified teaching example: a reflected point misses its counterpart by four pixels, while the pupils are one hundred pixels apart. The normalized difference for that example is four divided by one hundred, or 0.04. If the whole drawing is doubled in size, the same relationship becomes eight divided by two hundred, still 0.04. These are illustrative arithmetic values, not a recommended facial target or the exact full reporting formula. Their purpose is to show why a denominator makes a distance comparison easier to interpret.
Keep the raw relationship separate from the subscore
The symmetry report may display a measurement alongside a reference comparison on a zero-to-one-hundred scale. These answer different questions. The raw measurement describes the paired-point relationship calculated from the image. The subscore expresses how that measurement fits the product’s chosen reference settings. A change to those settings could change the subscore without moving any landmark. When investigating a surprising result, start with the measurement and the image conditions instead of treating the larger display number as self-explanatory.
Read the units and labels carefully before comparing two saved reports. A value written as a ratio cannot be directly compared with a value written as an angle, and a reference subscore is neither of those. If you are recording results in a notebook, give each its own column. For example, use “symmetry reading,” “reference comparison” and “photo condition” rather than putting all three into a single field called score. The extra labels prevent a common mistake: comparing different kinds of numbers because they happen to appear near one another.
Separate image rotation from head rotation
Turning an entire image like a flat sheet of paper changes its orientation in the frame. Turning your head changes which parts of a three-dimensional face are visible to the camera. These are different transformations. A tool can adjust its local axis for some in-plane rotation without reconstructing the hidden side of a turned head. This is why aligning the pupils in the photograph does not make a strong three-quarter view equivalent to a frontal reference photo.
For a practical check, take a clear frontal photograph, then take another with a small deliberate head turn while leaving the camera in place. Label the second image rather than trying to remember the condition later. The visible widths and outline locations may differ between the two sides. If the tool rejects the turned image, that is useful information about the supported input range. If it accepts it, read the measurement as belonging to that pose and avoid describing the difference as a change in your underlying face.
Watch expression and visibility
Expressions move several landmarks at once. A smile raises the cheeks and changes the mouth corners; a raised eyebrow changes the shape of the upper eye area; a squint changes the visible opening around an eye. An expression can also be slightly different on each side. The detector is processing the visible state in that instant, so the paired-point differences may reflect the expression. A relaxed reference photo makes it easier to distinguish that effect from other changes in capture conditions.
Visibility matters separately from expression. Hair across one eye, a hand near the cheek or a strong reflection on a lens can obscure a counterpart point. Before looking at the symmetry subscore, inspect both sides of the original photo at a useful size. Ask whether comparable details are visible on each side. If one eye corner is clear and the other is hidden, a new capture with better visibility is a more informative next step than trying to interpret the difference as a structural feature.
Try a drawing exercise before interpreting a face
Draw a centerline and place two pairs of dots on either side at equal horizontal distances. Reflect the left-side dots across the line and observe that they land on their counterparts. Now move one dot slightly upward while leaving the other pair unchanged. The drawing shows how a local difference can increase one pair’s mismatch without changing the entire shape. This makes it easier to understand why a summary reading can combine several relationships rather than describe one visible feature in isolation.
Next, move the centerline without moving the dots. The apparent mismatch changes because the measurement reference changed. Finally, enlarge the entire drawing uniformly and compare absolute distances with normalized ones. These three exercises distinguish point placement, axis placement and scale. You do not need a sophisticated drawing application: paper, a ruler and a few colored dots are sufficient. The purpose is to build intuition about the calculation before applying emotionally loaded labels to a number shown beside a face photograph.
Make a useful two-photo comparison
Use the same camera, similar distance and even lighting for both images. Take the first with a relaxed expression and the second after one deliberate change, such as a smile. Keep both original files and record the condition before uploading. Once the reports are ready, compare the symmetry measurement with nearby metrics rather than looking only at the top number. A change around the eyes might coincide with a change in eye width or canthal tilt, which helps locate the part of the image worth inspecting.
Do not assume that every difference is caused by your deliberate change alone. Small movements, exposure adjustments and landmark estimation can still vary. If you need another reference, repeat the original condition once and compare it with the first capture. This is a simple check of your setup, not a formal validation study. Describe the outcome narrowly: “these two photographs produced different readings under these conditions.” That wording retains what you observed without implying that the method has established a general rule about expression or attractiveness.
Read the report and choose a stopping point
A practical review has three steps: confirm the photo is suitable, understand what the measurement compares, and identify whether a visible capture issue explains an unexpected output. If those steps are complete, you have enough information to use the report as a measurement reference. More uploads do not automatically add insight. Repeating the same action without a new question can produce a collection of numbers with little explanatory value, especially when each photo changes several conditions at once.
For deeper technical detail, the methodology explains the product’s reference settings and the role of symmetry in the optional combined calculation. The analyzer page provides the complete eight-measurement report, while the photo-condition guide helps you investigate camera-related changes. Use the checklist below when preparing a new symmetry reference. Keep the original image and its labels together, compare like with like, and return to the actual landmark definition whenever a number feels disconnected from what you can see in the photograph.
Your practical checklist
- Read the definition of the paired landmarks and local axis.
- Use a frontal image with both sides clearly visible.
- Check hair, reflections and shadows near the eyes.
- Record raw measurements separately from reference subscores.
- Keep camera distance and lighting consistent between captures.
- Change one expression or pose condition at a time.
- Stop once you can explain the comparison in terms of the images.
References and next steps
The illustration and practical exercises are original educational examples. For the tool’s implementation details, read the measurement methodology and Google’s Face Landmarker documentation.
Explore Face Attractiveness Analyzer or open the free eight-measurement report.
Corrections or questions: [email protected].